


This post contains affiliate links. Read disclosure for more info.
How To Start An Online Boutique - Beginning Steps
Starting an online boutique can be a challenge if you don't know how to start planning your launch. Below is a list of beginning steps to consider before you start an online boutique. Starting a boutique business will also give you the freedom to work from the comfort of your home and choose your own hours.
1. Choose The BEst Ecommerce Platform
Where are you going to sell your products? I recommend Shopify (click for free trial) because it has advanced capabilities for an affordable price. There are many apps and social media channels that can be connected to your online shop so you can confidently sell your products everywhere.
Click here for a free trial of Shopify
2. Name Your Online Boutique
Search your state directory to find a unique business name for starting your boutique. You will need to register your business name before starting an online boutique.
3. Get a Domain Name For Your Boutique
When you sign up for Shopify you can purchase a domain name for your boutique in your dashboard and link it to your website right away. Always go for the .com extension when possible.
4. Choose Your Boutique Business Structure
Decide whether your online shop with operate as an LLC. You could also operate under a DBA or form a corporation. Bizee can help you form your business for an affordable filing fee.
Click here for help forming your business entity online now.
5. Get a Seller Permit & Sales tax ID
A seller permit could also be called a resale permit, reseller license or something else depending on your state. This type of permit is required by any business selling merchandise in many states. If you are located in a state with sales tax, you may also need a sales tax ID for paying quarterly sales tax. Contact your state business department to learn more about the exact requirements to start an online boutique where you live.
6. Determine your boutique's brand & ideal customer
Determine what type of clothing you will sell in your online store and who your target audience is. Design your brand to reflect your style and attract your target market.
7. Find Wholesale Boutique Clothing & stock your Inventory
Finding wholesale boutique clothing and stocking your inventory is something you will need to do before launching. Build a business relationship with trusted wholesale clothing suppliers providing high-quality products. Make sure the clothing styles you select aligns with your brand.
Starting An Online Boutique With Shopify Tutorial
STEP 1: SIGN UP FOR SHOPIFY
The first thing you need is a Shopify account. I use Shopify and highly recommend it! I have even partnered with Shopify to offer a free trial to my followers:) This trial will give you time to explore the capabilities and begin setting up your store before having to pay a penny.
Click here for a free trial of Shopify
Once you've signed up, login to Shopify. Click the "Select a plan" button at the bottom of the screen.
This button will take you to a page with different plan options. I recommend trying out the Shopify plan in the middle. Your free trial gives you a chance to play around with the premium features for free.
STEP 2: ADD PRODUCTS TO YOUR ONLINE BOUTIQUE
When you click on the Products tab, you will then see an “Add Product” button on the right side of the page. When adding a product, you will see a page that looks like this:
From there you can fill out all the info for each product. Below I describe some of the sections and give you a few tips.

Add a title - be sure to include keywords in the title to boost SEO. An example of a good title is 'Ivory Crochet Fringe Cardigan Sweater' or "Black Lace Long-Sleeve Dress". Try to include descriptive keyword in the title, rather than using something simple like "black dress" or "white sweater".
Add a product description - Be sure to include more keywords in the product description. Describe the item in detail, include fabric info (i.e. 100% cotton, etc), include measurements if necessary. Create a visual for your customer: 'this is the perfect sweater for a cool summer night', etc.
Upload your images - Upload your product images. Be sure they have great lighting and show the product at multiple angles.
Price your product - What will your ideal customer be willing to pay for your product? A popular pricing method is to make sure your profit is 2x the wholesale cost. Take into consideration that you may run promotions or include discount shipping options.
Select your inventory policy - If you want Shopify to track your inventory, select "Shopify tracks this product's inventory" on the Inventory Policy drop-down menu. If Shopify tracks your inventory you can enter the quantity of how many products are in stock for each size of a product. This is very helpful because Shopify will automatically mark products as sold-out when necessary.
Add Product Variants - Here is where you add the different sizes available for your product. Also add the quantity of each size so Shopify can keep track. You can also add a color variant if an item comes in another color.
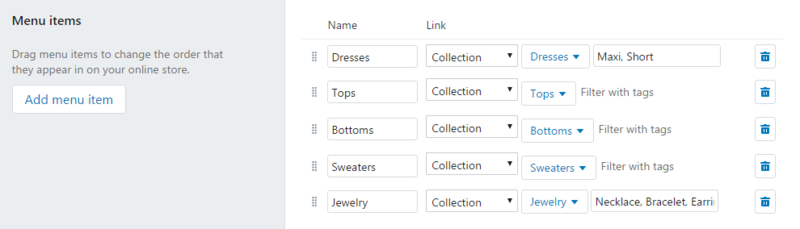
STEP 3: CREATE YOUR COLLECTIONS AND NAVIGATION MENU
Go to Collections in the Products menu. Let's create a collection for each category in your online shop: tops, bottoms, skirts, etc.
Create a title for your first collection (tops, bottoms, skirts, etc)
Create a condition. Product type is equal to whatever you entered as the collection title. Here is an example for creating a collection for Jewelry.
(You can also add products to your collections manually when you add new products).

Repeat steps 1 and 2 until you have created a collection for each category of clothing you will have in your shop.
Go to Navigation in the Online Store menu. On the Main Menu click Edit menu on the right side. This is where you will define which items will appear in the navigation menu.
STEP 4: MAKE YOUR Boutique website PRETTY
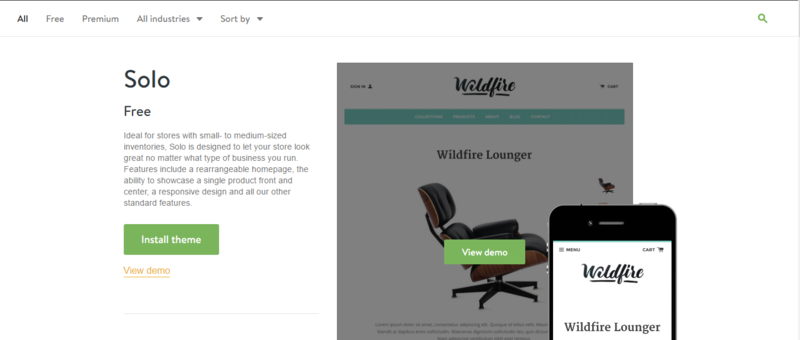
On the left-hand menu, click "online store" about halfway down under “sales channels”. Next click "Themes". Next, look for the button that says "Visit Theme Store"
This will open a new tab with many options for your store. There are both free and paid themes and you can specify which you'd like to view on the top menu.
Click on the theme you like to read the full description. This is also where you can click "view demo" to see what this theme will look like with your products. If you like what you see, then click "Install theme".
After installing your theme, make your way back to the online store dashboard. Now while under the themes menu again, click the blue button on the right-hand side that says "customize”.
On the right side, you'll see a menu with options of what you can customize. For example, under “theme settings” the first option listed is to edit the colors.

The menu on the right also gives you options to customize the home page.
Play around with different design options until you are happy with how everything looks
Don't forget to add your social media accounts so your website visitors can connect with you!


